Blogs give your students' work an audience. Here's an easy way to set up student blogs with Google Slides.
Blogging has really democratized the world of writing. Now, you don't have to pass through a gatekeeper (book publisher, magazine editor, etc.) to get your ideas out there. You can start a blog, publish, and share it with the world. You might not have a massive audience, but you do own a little piece of digital real estate when you publish on a blog.
Blog writing isn't just for adults. Student writing benefits from an audience, too.
When students don't have an audience for their work, they're just doing work for their teacher.
Want to motivate students to write? Give them an audience to write for.
Want to kick that motivation into overdrive? Let their audience interact with them about what they've written.
Finding a blogging platform for students can be tricky. For example ...
- Blogger is Google's free blog platform. But can clunky to set up and use for students in a class.
- Kidblog is a great full-fledged student blogging platform, but it's not free.
- Edublogs has a free plan, but it's limited.
- Many other blog platforms that aren't made for education aren't compatible with features and student privacy needs.
Plus, things get complicated and time-consuming with the more tools and apps and sites you use.
Thankfully, you don't need yet another app to do easy, quick blogs ...

Quick student blogs with Google Slides
In a Google Slides student blog, a single slide presentation serves as the blog itself. Each slide serves as a blog post. A Google Doc or Google Site serves as a home base where students can access each other's blogs quickly. Students can visit each other's blogs and leave comments.
When I need to dream up an activity to do in the classroom, my tool of choice often is Google Slides. It's super versatile and, of course, it's FREE.
- Google Slides is a tool students likely are already familiar with.
- The user interface of Google Slides is similar to other productivity tools like Docs and Sheets.
- Google Slides divides work up in individual slides, which keeps things neatly organized.
- Commenting and real-time collaboration is built into Google Slides.
If your students already have a school Google account, they won't need yet another username and password.

What is a blog?
A blog is a website that allows the creator to update the site regularly with posts: articles, images, other items, etc. The word "blog" comes from the word "weblog," which computer programmers used to catalog changes made to a website. Common features of a blog:
- A home page where you can see all of the posts
- A reverse chronological organization, putting the most recent post at the top
- Posts written by an author (or co-authors) with text, images, embedded videos, etc.
- Comments from readers to create conversation about a blog post (with responses from the author)

How can we use student blogs in a classroom?
Blogs can be a great forum for writing and creation for the classroom. When the blog is shared with others, it gives students an audience for their work. Plus, it creates great opportunities to interact with others around a given topic.
Teachers can set up student blogs to encourage students to ...
- Reflect on characters, events, settings, and plots they read about (or watch in movies)
- Talk about their learning and their process for solving problems
- Document activities they do (like science labs and math problems)
- Share about their day to day lives and their feelings
- Report on happenings at the school and in the school district
If you want blogging to become a serious part of your class or your school, you might want to check out Kidblog (kidblog.org), which I've used in the classroom and is solid.
But if you want a quick, no-frills way to do blogging with a platform you already have in place, you can get started in Google Slides in a matter of minutes!

How to set up quick student blogs with Google Slides
If you run your student blogs in Google Slides, it's easy to get them up and running. You can create all of the files and do all of the set-up to get it started pretty quickly. Plus, you can share it with your students in your Google Classroom or learning management system (LMS) to get them to work quickly.
Step 1: Decide what kinds of blogs students will create
One of the first decisions you'll want to make is whether to use individual student blogs or a single class blog.
Individual student blogs: Each student has his/her own blog. The student is the only one who creates posts to that blog. Others visit to view the blog and leave comments. With individual student blogs, it can take a while for the blog to feel full, or rich with content. But individual blogs are more likely to create a sense of personal ownership than a whole-class blog.
A single class blog: In this blog, different students write posts for the blog. A single class blog can be where students share their best, most favorite work with an audience (parents, families, the community, etc.). It can serve as a news outlet for what your students are doing. Because the whole class is working on it, it can fill up with content much faster. However, it isn't as personal has having your own space to share your own work.
This blog post focuses on creating individual student blogs. Honestly, if you want to create a single blog for your whole class, it might be easier to use one of the blog platforms mentioned above -- or even a free commercial blog platform like WordPress.com. That will make it easier to share with others and navigate. You can take student writing and post it to the blog for them.
Step 2: Create a home base for your student blogs.
If all of your students are going to have blogs, you'll want a home base where you -- and your students -- can easily access each other's blogs. There are lots of options, but here are a few of my favorites:
- Google Docs: This is about as no-frills as it gets. Create a document. In a bulleted list, put each student's name on its own line. That's where students will add a link to their blogs (in a step below).
- Google Sites: This takes a little more set-up but gives you lots of design freedom and ability to add more things. Google Sites are much easier to share with other audiences. You'll add links to the students' Google Slides blogs from this site.
- Wakelet: Wakelet (wakelet.com) is a tool for building collections. It's kind of like an education-focused version of Pinterest. In a Wakelet collection, you can add links to students' Google Slides blogs to make them easy to access for the class. Plus, you can share a Wakelet collection with others.
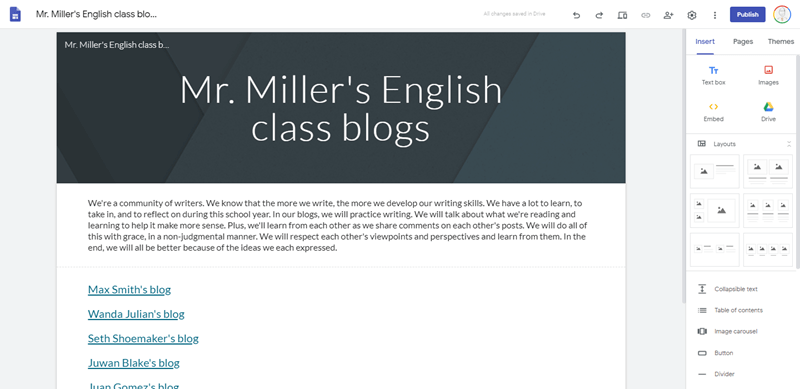
No matter the platform, you'll likely want to give your home base a title (Mr. Miller's English class blogs) and add some text about norms and expectations. (More on that later.)

A simple Google Site with links to students' Google Slides blogs can serve as a home base.

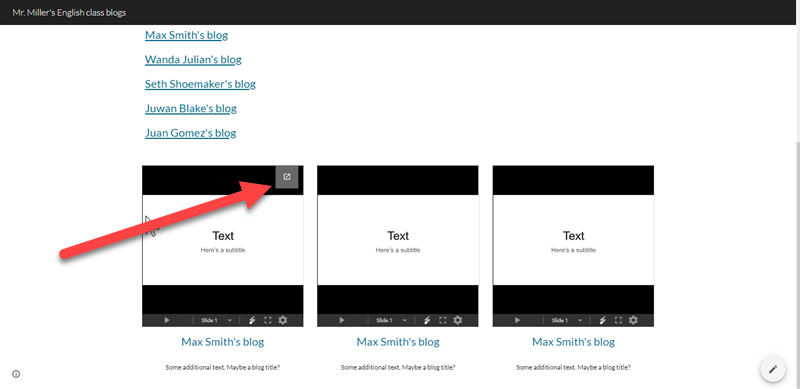
In Sites, you can display Google Slides files in columns. This is an alternative to just simple links. Students can hover and click the button in the top right to go to each other's blogs.
Step 3: Students create Google Slides file(s) for their blogs
It's easy to create a new Google Slides file: open Google Drive and click the "New" button, then choose "Google Slides." You can also type "slides.new" into your web browser to generate a new Google Slides file without opening Google Drive.
An important question: Who creates the Slides file? The person who creates the file is the file owner.
You could create all of the Google Slides files for the student blogs if you wanted. This might be appealing if you want to set everything up and have it ready to go when you see the students next. However, I suggest something different -- and much easier for you.
Have students create their own Google Slides blog files. During class, ask students to create a single Google Slides file. They give the file a filename with their name in it (i.e. "Max Smith's English class blog") and then proceed to the next step.
If you'd like to format what their blogs will look like, you can create a Google Slides file, share it with your students, and let them make a copy (File > Make a copy).
Pro tip: You can create a link that forces students to make a copy of a file. Click the Share button, then create an "Anyone with the link can view" link. Copy the link. Then, after you paste it, delete the word "edit" and anything after it, replacing it with the word "copy". When students click on that link, it'll ask them to make their own copy of your file.
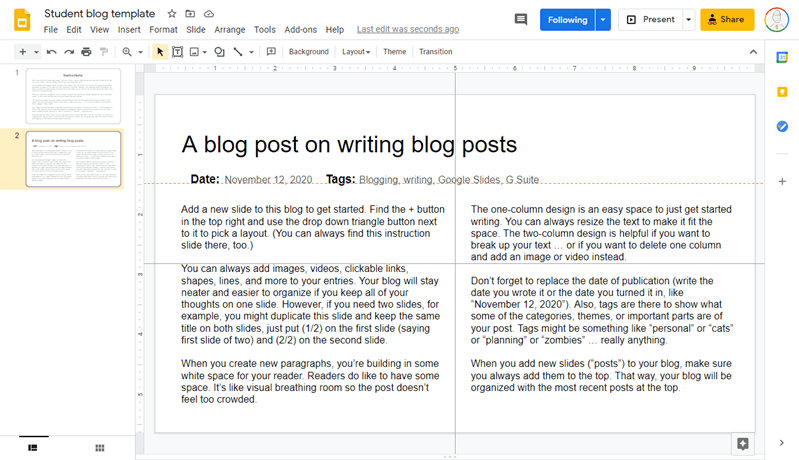
Or you can use this very simple student blog template I've created (below). Just give them this link and it'll prompt them to make a copy.
Step 4: Students give you a link to their Google Slides blogs
You'll need to collect links to the students' Google Slides blogs. Then, you can share them in the home base you created earlier and students will be able to access each other's work.
Students click the Share button in their Google Slides blog files. Then, they change the access to "Anyone with the link can comment". With this link, students can view their fellow classmates' blogs. They can make comments on each other's blogs. But they won't be able change each other's files around. Students give you the "comment" link. There are a few ways you can do this:
Ask them to drop the link in a Google Doc. Create a Google Doc. It can be a very basic document that you'll use to copy links over to a Google Site home base for your blogs. Or, if you created your home base (above) with a Google Doc, you can just share that document with the students. Either way, in your document, use the Share button to create an "Anyone with the link can edit" share link. Copy that link.
Share the link to that document with them in Google Classroom or their learning management system (LMS). You can even pre-load that document with their names -- one name per line. When they get in that document, they just paste the link to their slide presentation next to their name.
- If you chose to use a Google Doc as your home base above, this document can become the home base that students will use to access each other's blogs.
- If you chose to use a Google Site or Wakelet as your home base, you can pull the student Google Slides blog links off this document. Add those links to the Google Site or Wakelet so students can access each other's work.
When the home base has working links to each student's Google Slides blog, share the link to that home base in an easy to access place in Google Classroom or your learning management system (LMS).
Step 6: Start writing!
Now is when the fun begins! Now that everything is set, you can create your first blog assignment. Students work from a new slide moved to the top of the slide presentation. You call the shots, so you get to tell them what they're writing about, what to include, etc. Or you can give them lots of control and flexibility. The choice is yours.
When students are done, they can go to your home base and click on each other's blogs to reach each other's posts. This is where the commenting part takes place. Remember, earlier, students created "Anyone can comment" links for their blogs. When a student goes to your blog home base and clicks through to another student's blog, that student can leave a comment on the other student's Google Slides blog. The student can click on an item on a slide (a title, a text box, etc.) and click the comment button (a speech bubble with a plus sign). All students -- the original blog author and other students -- can reply to each other's comments, making it like a comment conversation.
When you ask students to comment on each other's blogs, there are two main possibilities I see:
- Assign the students to write a post. After everyone is done (maybe the next day), encourage students to read each other's posts and comment. This isn't immediate, but it does mean everyone gets to see everyone else's finished product.
- Assign a post. Then, as students finish, they can leave comments immediately while others are still writing. This does mean that not everyone gets to see the finished products, but it does provide immediacy and an outlet for students who finished early.
Although both of the above have advantages, I'd lean toward the first one. It won't rush those that take longer to finish. Plus, it lets everyone put finishing touches on their work and leads to less distractions.

Set norms and expectations
Without setting up some norms and expectations for student blogging, unwelcome behaviors could rear their ugly heads and poison the collaboration you're trying to build. Think through how you'd like students to use the space, how you'd like them to treat each other, and what they should accomplish with their writing. Post it in your home base, and talk about it. There's no shame in making changes as you go forward, and discussing those changes with your students will help them understand and follow along. In fact, the students may have valuable input on what the class norms and expectations should look like.
Some things to consider:
- What topics should students write about? Are there topics or is there language that's out of bounds?
- What purpose do comments serve? Are they for sharing opinions and examples? Are you looking for feedback on student writing? (If so, I recommend this article by Mark Gardner in Edutopia.)
- You may want to encourage students to treat others respectfully, as they would if they were talking face to face.
- You may want to discuss how students should handle comments that they don't agree with, comments that go against what they believe or feel, or comments that make them upset.
How have you used blogs in your classroom? What advice or tips to do you have for doing student blogging? Share your ideas in a comment below!
For notifications of new Ditch That Textbook content and helpful links:
Are you looking for quality, meaningful professional learning that both equips and inspires teachers?
Matt provides in-person and virtual keynotes, workshops and breakout sessions that equip, inspire and encourage teachers to create change in their classrooms. Teachers leave with loads of resources. They participate. They laugh. They see tech use and teaching in a new light. Click the link below to contact us and learn how you can bring Matt to your school or district!
Is Matt presenting near you soon? Check out his upcoming live events!


That’s a great option! Thank you for the detailed explanation. I would also consider Blogger.com and Medium as a platform for a student blog. Blogging stimulates self-expression, enhances creativity and analytical thinking, helps to develop soft skills. It’s perfect for turning talents into benefits https://ivypanda.com/blog/blogging-is-my-profession/. Plus, it may become a source of extra income.
Thank you for this helpful stuff I got at your site. The stuff here is really good and keep up sharing.
Great work! That shows your effort!
This is nice and very helpful.
We also have educational blogs here https://www.justlearn.com
I am planning on doing blogging with my HS class, and I use Classroom. I am wondering why you didn’t suggest that I make a slide template and assign it to students, making a copy for each student. That way I already HAVE the links to their slides, in the Classroom folder. Or am I missing something here?
I like your suggestion of having them all accessible on a Googlesite. Since I already have a Googlesite for my class, I will just add another page that will be linked to each of their slides.
Thanks for the tips and inspiration!
Adele