
Great templates can drive great classroom learning. Learn step-by-step how to make your own with Google Docs and Slides.
When I find a good template online, it makes me want to jump for joy. Templates save us time. They give us ideas and get us started. And when we find a good one, students benefit.
Do you ever wish you could create your own templates? When you do …
- You don’t spend time fishing for just the right thing.
- The content is customized to what your students need.
- You decide the order, the difficulty … everything!
It may not be as hard — or as time-consuming — as you think.
Plus, you can use Google tools that you’re already familiar with to create them.
With a good template, you can create …
- something printable that students can work with a pencil
- something digital that students can manipulate on a screen
Here’s a step-by-step tutorial to get you started creating your own templates to assign to students!
1. Decide what you want on your template.
Sketch it out on a sheet of paper. Make a bulleted list. For many people, identifying their goals and the basics first makes things easier. If you can imagine your template in your mind, you can skip this step.
2. Choose an app to create your template.
- If you want to use Google Slides, open a new Google Slides presentation.
- If you want to use Docs, Sheets, Drawings or anything else, choose Google Slides instead!
Here’s why Google Slides reigns for most templates:
- It lets you lock items in the background so students can’t move them.
- It gives you more design flexibility.
- It opens up more options for activities (i.e. dragging, labeling, etc.).
If you really, really need to use Google Docs, create your document and jump down to STEP 7 below.
3. Resize your slides. (Optional)
Google Slides defaults to a 16:9 ratio for its slides — the standard for most LCD projectors.
But wait — your students likely won’t be projecting your template to a projector, right?
In that case, let’s make the page whatever size we want! Some things to consider:
- Using letter size (8.5″ x 11″ or 11″ x 8.5″ in the US) is a good size for a printer. They’re also very recognizable dimensions.
- You can make it a square or a wide strip or a tall, narrow strip.
- Be careful not to make it too tall or too wide. Your template can scale to any size, but the bigger it is in any direction, the more students will need to zoom in and zoom out.
To change the dimensions of your slides in Google Slides, go to File > Page setup.

4. Design the parts that students won’t change.
The title. The instructions. Images. An outline/frame around where student responses will go.
Anything that students won’t write on and manipulate. That’s where we start.
Whether you’re doing a one-page template or a multi-page template, design everything students won’t change first.
TIP: If you like the idea above of creating an outline/frame around what students will type or add …
- Go to Insert > Shape to draw a shape.
- Use the paint bucket icon to change the background color — even to transparent.
- Use the line width icon (three different-sized lines) to make the outline thicker or thinner.
- Use the pencil icon to change the color of your outline.

Use shapes to show students where to put items or where to write.
5. Lock everything into the background.
Once you’ve created everything your students won’t change, it’s time to make it all immovable. Locking everything into the background will prevent students from moving things — accidentally or intentionally!
- Click on the title of your slide presentation. If you haven’t changed it, it will say “Untitled presentation”. (Going to File > Rename will work, too.) Give your file a name. End it with the word TEACHER.
- Click on a slide thumbnail in the list on the left. (Multi-page template: start with the first one. Single-page template: it’s your only slide!)
- Go to File > Download as … > PNG.
This saves your slide as an image file. Think about it. You can’t move anything around on a single image file! This is what locks it into place.
Now, you need to insert this image of your slide as the slide background. Here’s how I suggest doing it …
- Create a new slide presentation. (The one you’re working on now can be your TEACHER template in case you ever want to change your background.)
- If you changed the size of the slide in your original template, go to File > Page setup and change the size of this one, too.
- Click on the title of your slide presentation. (Again, “Untitled presentation.”) End it with the word STUDENT.
- In the menu, go to Slide > Change background.
- Click the “Choose image” button. Find the image of your TEACHER slide. The filename should be the name of your TEACHER slide presentation.
Boom. Done!

If you have multiple pages, you can do this same process for each slide in your template. (Note: When you download slides as images, it will continue to save with the same filename but with a number. Keep an eye on how it generates new file names and you’ll figure out which one is which.)

Here’s an example of a page where I locked items in place as the background image.
6. Add the parts students will change/write on.
On the STUDENT template, you should have all of your slides with the new backgrounds.
Now it’s time to add the parts that the students will interact with. This could be text boxes. It could be shapes and images you want them to drag into place.
- Add text boxes. If you use regular text boxes (the icon with the A on it), they’re a little harder to accidentally click and move around.
- Add shapes (Insert > Shape). These could be arrows, squares, math symbols … even speech bubbles! You can double-click a shape to add text to it. (See #4 above to format your shapes.)
- Add images. You might want students to move images into sequence or to choose the best image for the situation.
You have two places to put the parts students will change/write on …
- You can put them ON THE SLIDE. Put them here if you don’t want to give students a choice on where they go.
- You can put them NEXT TO THE SLIDE. That’s the gray workspace around the slide. Think of this as a place to put your tools on a workbench. Students can drag anything you put here — text boxes, images, shapes, lines — onto the slide. You can save students time if you put things here that you think they’ll want to use. In my Google Slides icon boards, I leave a bunch of icons in the workspace so students can use them to make infographics.
With this template, I left lots of icons for students to use in the workspace. I kept the slide blank so students could create in it.
7. Share the template with your students.
There are several ways to do this!
With Google Classroom …
- Create a new assignment in Google Classroom. Type the title and description.
- Add your template as an attachment from Google Drive.
- On the drop-down menu next to the attachment, choose “Make a copy for each student.”
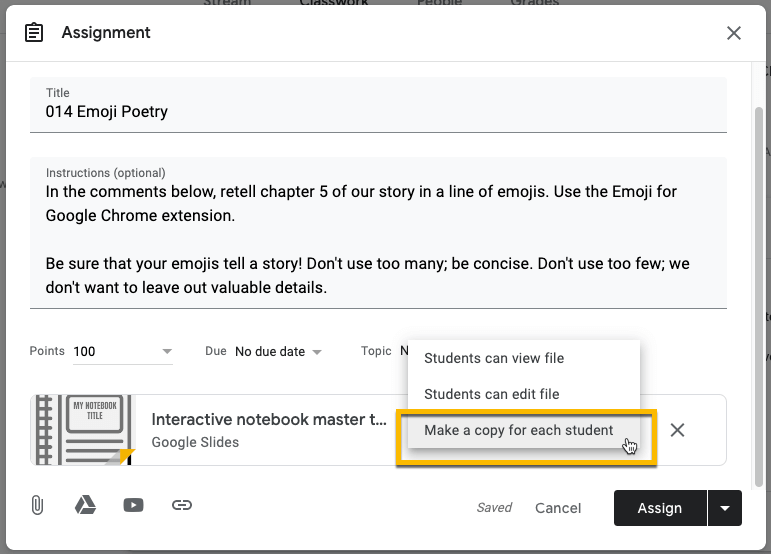
Make a copy of a file for each student by clicking “Make a copy for each student” in the attachment drop-down in Google Classroom.
With another learning management system (LMS) like Canvas, Schoology or Blackboard …
- In the STUDENT version of your template, click the “Share” button. Click the “Get shareable link” button.
- In the drop-down menu, choose “Anyone with the link can view.” Copy the link.
- Create a new assignment. Add a link to the assignment (in the description, with a link button, etc.)
- When you paste the link, go to the end of the link URL. Find the word “edit”. Delete the word edit and everything AFTER it. Type the word copy.
To force students to make their own copy of your template to use, change the word “edit” and everything after it to “copy”.

Check out this post by Tony Vincent and grab his awesome URL hacks glanceable graphics.
Read Google Document URL Tricks by Tony Vincent
With no learning management system (LMS) …
- In the STUDENT version of your template, click the “Share” button. Click the “Get shareable link” button.
- In the drop-down menu, choose “Anyone with the link can view.” Copy the link.
- Go to tinyurl.com.
- Use the link to your template as the “long URL to make tiny”.
- You can create your own link (case sensitive) if no one has taken it before you. (Otherwise, just click the “Make TinyURL!” button.)
- Copy the link that TinyURL created and distribute it to students. You can display it on a projector or even write it on the whiteboard/chalkboard.
8. You’re done!
Now, your students should have access to your template — AND they should get their own copy of it!
Here’s some more good news …
You can reuse your template for other lessons! This is great for making new templates that are similar to the one you just made.
Just go to File > Make a copy to copy your template. Then you can remix it to use it for other lessons instead of creating a brand new template from scratch!
Check out our Templates page!

We even have a “Templates” page on our website with TONS of ready to use resources for you! Our Google Slides and Google Drawings templates get your students to work quickly. Make a copy. Adjust as necessary. Assign to your students. Yep, that easy.
Check them all out at ditchthattextbook.com/resources/templates.
More resources:
For notifications of new Ditch That Textbook content and helpful links:
Are you looking for quality, meaningful professional learning that both equips and inspires teachers?

Matt provides in-person and virtual keynotes, workshops and breakout sessions that equip, inspire and encourage teachers to create change in their classrooms. Teachers leave with loads of resources. They participate. They laugh. They see tech use and teaching in a new light. Click the link below to contact us and learn how you can bring Matt to your school or district!
Is Matt presenting near you soon? Check out his upcoming live events!
This is no longer working – new assignment, attach existing doc from my drive which I created, one point, with or without due date. I only get two options students can view or students can edit. The student can open and write on the document but they cannot turn it in!?!?!?!?
If I edit the template by adding pages, does that get pushed out to the kids? Will it change what they have already completed?
I created a template on slides and added the Slide on Classroom and made a copy for each student. The text box pops up for them but they can not type in it so I think that I have missed a step somewhere?
I can’t say “Thank you” enough! The free resources are awesome! The templates make the planning process easier and less time consuming.
What if you have created a Google slide template in Google Classroom and shared it with your students so they have their own copy to work on and later you realized there is something you want to change in the slide template and push these changes out to all the students while saving any work they have already done to the original copy they have?
Thanks
Have you found an answer for this?
Thank you so much for taking the time to type this out! It worked perfectly for me 🙂
[…] Ditch That Textbook’s How to Create Templates in Google Docs and Slides […]
[…] Templates save us time. They give us ideas and get us started. And when we find a good one, students benefit. Want to make your own templates like the ones above? Click here to learn how! […]